


Running a small apparel business means balancing quality with tight budgets. Traditional printing services can drain your margins fast, especially when you’re testing designs or producing small batches. Learning the DIY screen printing process gives you control over costs, timelines, and creative freedom. This guide walks you through everything from gathering essential tools to executing flawless prints, troubleshooting common issues, and verifying quality. Whether you’re launching your first clothing line or expanding an existing brand, mastering screen printing in house transforms how you operate and compete.
Table of Contents
- Key takeaways
- What you need: Tools and materials for DIY screen printing
- Step-by-step DIY screen printing process
- Avoiding common mistakes and troubleshooting your prints
- Measuring success: verifying quality and managing production
- Discover DIY Printz solutions for your apparel business
- FAQ
Key Takeaways
| Point | Details |
|---|---|
| Cost savings for small runs | DIY screen printing lowers costs when testing designs or producing small batches. |
| Essential tools and materials | Gather screens, squeegees, inks, emulsion, and a suitable workspace to ensure consistent results. |
| Systematic printing workflow | Follow a complete step by step workflow from artwork preparation to curing to ensure quality prints. |
| Troubleshooting and verification | Address issues early and verify prints to maintain professional results. |
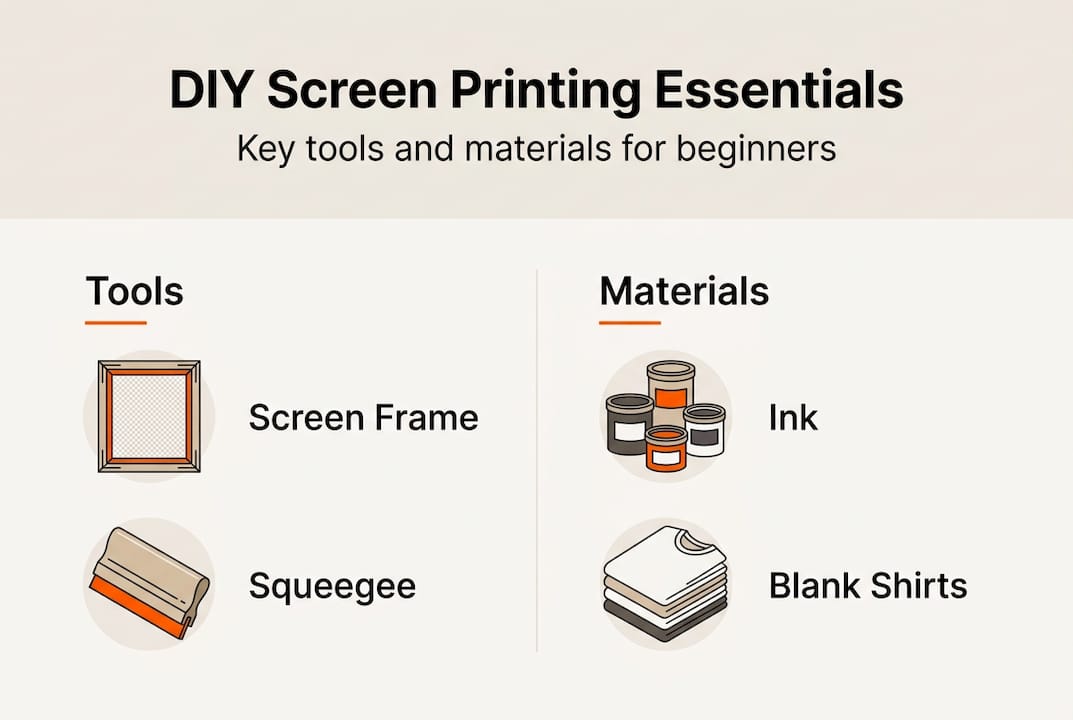
What you need: Tools and materials for DIY screen printing
Before you print your first shirt, assembling the right equipment saves frustration and money. Essential items include screens, squeegees, inks, emulsion, and a workspace that can handle wet materials and ventilation needs. Your screen frames should match your typical design size, with mesh counts between 110 and 160 threads per inch for most apparel work. Higher mesh counts capture finer details but require more pressure and slower passes.
Ink selection depends on your fabric types. Plastisol inks work across most materials and don’t require heat to dry, though they need curing at 320°F for durability. Water-based inks create softer prints that breathe better but demand faster work since they dry in the screen. Stock both types initially to understand which suits your designs and production pace. You’ll also need emulsion for coating screens, a scoop coater for even application, and a light source for exposing your designs onto prepared screens.
Your workspace needs a flat surface for printing, adequate lighting, and access to water for screen cleaning. A heat gun or conveyor dryer handles curing, though small operations can start with a heat press if you already own one for other applications. Fabric choice matters as much as equipment. Cotton and cotton-poly blends accept ink readily and produce vibrant results. Pure polyester requires special low-temperature inks to avoid dye migration, where heat causes fabric dyes to bleed into your print.
| Tool/Material | Primary function | Approximate cost |
|---|---|---|
| Aluminum screen frames with mesh | Holds stencil and transfers ink | $15 to $40 each |
| Squeegee with appropriate durometer | Pushes ink through screen mesh | $8 to $25 |
| Plastisol or water-based inks | Creates printed image on fabric | $12 to $30 per quart |
| Photo emulsion and sensitizer | Forms stencil on screen | $20 to $50 per kit |
| Exposure unit or strong light | Hardens emulsion to create stencil | $80 to $300 |
| Heat source for curing | Sets ink permanently into fabric | $40 to $600 |
Pro Tip: Buy screens pre-stretched rather than stretching mesh yourself. The tension consistency matters more than the $10 to $15 you might save, and uneven tension causes registration problems that waste far more in materials and time.
Sourcing supplies strategically cuts startup costs without sacrificing quality. Local screen printing suppliers often sell starter kits bundled at discounts. Online marketplaces offer competitive pricing on inks and consumables, though shipping costs add up on heavy items like screens. Check for used equipment from shops upgrading their systems, but inspect screens carefully for tears or permanent stains that compromise print quality. The DIY fabric printing process guide provides detailed equipment specifications if you need to compare options.
Step-by-step DIY screen printing process
Executing clean prints requires following a systematic workflow. Following precise steps from screen preparation to printing is key to quality results. Rushing or skipping stages creates problems that multiply as you scale production. Here’s the complete process broken into manageable phases.
-
Prepare your artwork digitally. Convert designs to high-contrast black and white images. Black areas become your printed sections, white areas remain fabric. Size artwork to final print dimensions and add registration marks if printing multiple colors.
-
Coat screens with emulsion. In dim lighting, mix photo emulsion with sensitizer according to package ratios. Using a scoop coater, apply thin, even layers to both sides of your clean, degreased screen. The print side (flat side) needs a thinner coat than the squeegee side. Let screens dry completely in darkness, typically 2 to 4 hours depending on humidity.
-
Expose your design onto the screen. Place your positive film or transparency on the print side of the dried, coated screen. Position your exposure unit or light source at the recommended distance. Expose for the time specified by your emulsion manufacturer, usually 3 to 8 minutes with a 500-watt bulb. Under-exposure leaves emulsion soft and washes out during development. Over-exposure hardens emulsion in areas that should remain open.
-
Wash out the screen to reveal your stencil. After exposure, spray both sides of the screen with water at moderate pressure. The unexposed emulsion (areas blocked by your black artwork) washes away, creating open mesh. Continue rinsing until you see clean, open areas matching your design. Hold the screen up to light to verify all intended areas are clear. Let the screen dry completely before printing.
-
Set up your printing station. Secure your garment flat on your printing surface using spray adhesive or a platen. Position the screen over the garment with registration marks aligned. The screen should sit about an eighth inch above the fabric when resting, creating proper off-contact distance that prevents smearing.
-
Load ink and make your first pull. Place a thick line of ink along the top edge of your design area on the screen. Hold your squeegee at a 45-degree angle and pull firmly across the screen in one smooth motion. Consistent pressure and speed produce even ink deposit. Lift the screen immediately after the pull to check coverage.
-
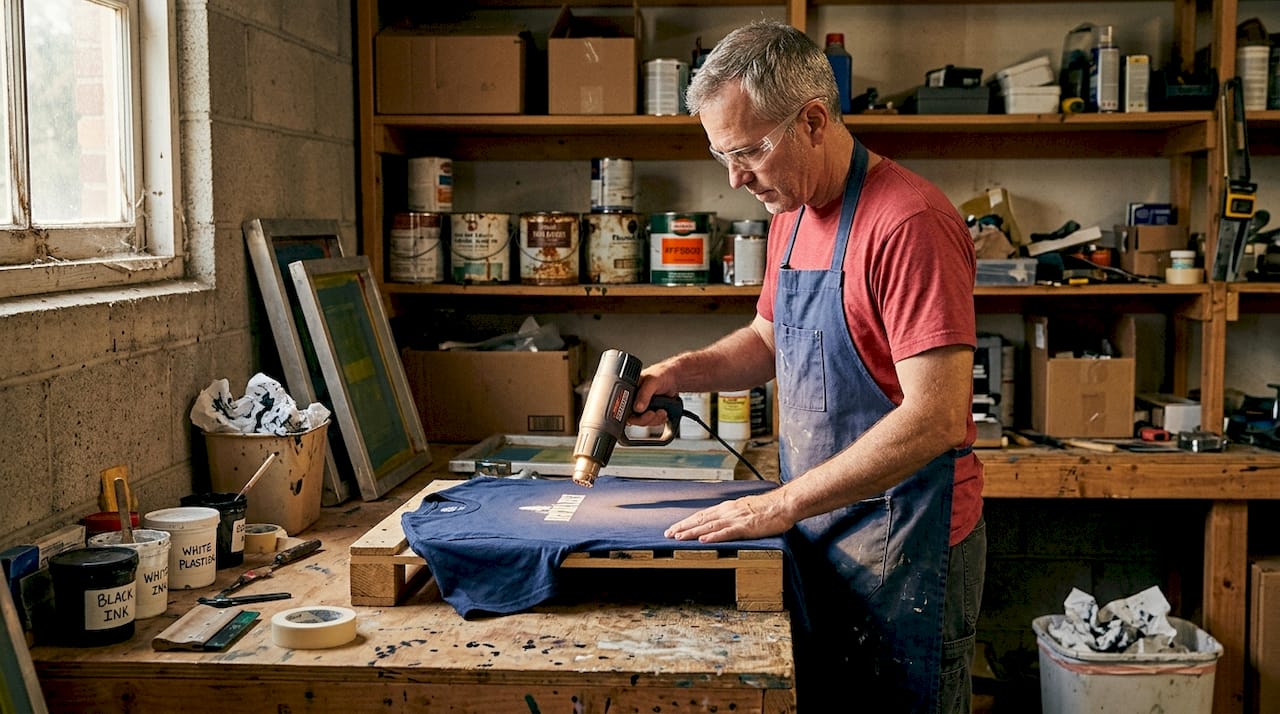
Cure the print to set the ink permanently. Plastisol inks require heating to 320°F for 30 to 40 seconds. Water-based inks need 330°F for similar duration. Use a temperature gun to verify actual garment surface temperature, not just the heat source setting. Under-cured prints wash out or crack prematurely. Over-curing can scorch fabric or cause dye migration on polyester.
Pro Tip: Mix a small amount of curable reducer into plastisol inks before printing. This lowers viscosity for smoother pulls and creates softer hand feel without compromising durability. Start with 5% reducer by volume and adjust based on your mesh count and desired print thickness.
Mastering these steps takes practice, but the workflow becomes intuitive quickly. The t-shirt printing tips 2026 small businesses resource offers additional technique refinements as you build experience.
Avoiding common mistakes and troubleshooting your prints
Even experienced printers encounter issues, but recognizing problems early prevents wasted materials and time. Common mistakes include ink smudging, poor registration, and insufficient curing. Understanding root causes helps you fix issues quickly rather than scrapping entire batches.
-
Ink bleeding under the screen: This happens when your off-contact distance is too small or your emulsion stencil has pinholes. Increase the gap between screen and fabric to about one-eighth inch. Inspect screens under bright light and fill pinholes with emulsion or screen filler before printing.
-
Uneven ink coverage with light or dark patches: Inconsistent squeegee pressure causes this problem. Maintain firm, even pressure across the entire pull. Check that your squeegee blade has a straight, sharp edge without nicks. Dull or damaged blades skip areas and create streaks.
-
Design details filling in or losing sharpness: Your ink is too thin, your mesh count is wrong for the design, or you’re applying too much pressure. Thicken plastisol ink slightly or switch to a higher mesh count for fine details. Reduce squeegee pressure and make sure you’re using only enough force to clear the screen in one pass.
-
Prints cracking or washing out after laundering: Insufficient curing is the culprit. Verify your heat source reaches proper temperature and that you’re exposing prints for adequate duration. Different ink brands have specific curing requirements, so follow manufacturer guidelines precisely.
-
Multiple colors misaligning between passes: Registration problems stem from inconsistent screen placement or garment movement. Use registration marks on your screens and printing surface. Secure garments firmly with spray adhesive. Consider building or buying a simple registration jig for multi-color work.
Quality screen printing demands attention to detail at every stage. A single shortcut in preparation, execution, or curing can compromise an entire production run. Treat each step as essential rather than optional, and your consistency will improve dramatically.
Safety considerations matter as much as technique. Work in well-ventilated spaces when using plastisol inks and solvents. Wear gloves during screen coating and cleanup to avoid skin irritation from emulsion chemicals. Keep heat sources away from flammable materials and never leave curing equipment unattended. Store inks and chemicals in clearly labeled containers away from food and beverages.
When problems persist despite troubleshooting, evaluate whether your equipment needs upgrading or if your process needs adjustment. Sometimes the issue isn’t technique but tool limitations. The why invest in diy apparel printing guide helps you assess when to improve your setup versus when to refine your skills.
Measuring success: verifying quality and managing production
Producing consistent, professional prints requires objective quality standards and efficient workflows. Consistently verifying print quality prevents costly errors and maintains brand reputation. Establish checkpoints throughout production rather than waiting until final inspection to catch problems.
Key quality factors to evaluate on every print include color accuracy compared to your approved samples, registration alignment when multiple colors overlap, ink opacity that fully covers the fabric beneath, and print durability that withstands washing without fading or cracking. Check hand feel to ensure prints aren’t excessively thick or stiff, which customers perceive as low quality. Examine edges for clean definition without bleeding or feathering.
| Quality aspect | Screen printing | DTF transfers | Heat transfer vinyl |
|---|---|---|---|
| Color vibrancy | Excellent, opaque coverage | Very good, slight texture | Good, depends on material |
| Fine detail capability | Limited by mesh count | Excellent, photo quality | Moderate, best for simple shapes |
| Production speed (50 pieces) | Fast once setup complete | Moderate, includes pressing time | Slow, individual weeding required |
| Durability and wash resistance | Excellent when properly cured | Very good, flexible and breathable | Good, edges may lift over time |
| Setup time and complexity | High, requires screen preparation | Low, direct from digital file | Low, cut and weed |
Managing small batch production efficiently means creating systems that reduce decision-making during active printing. Develop a pre-flight checklist covering screen inspection, ink mixing, test prints, and equipment setup. This prevents forgotten steps that cause problems mid-run. Batch similar jobs together to minimize screen changes and color mixing. Print all single-color jobs before switching to multi-color work.
-
Establish quality control checkpoints. Inspect the first print from each screen thoroughly before running the full batch. Check prints at regular intervals during production, not just at the end. This catches issues like ink drying in screens or registration drift before they affect many pieces.
-
Track production metrics to identify improvement opportunities. Record setup time, prints per hour, defect rates, and material usage for each job. Patterns emerge showing which designs or techniques need refinement. Calculate your actual cost per print including materials, time, and waste to price jobs profitably.
-
Create standard operating procedures for recurring tasks. Document your screen preparation process, ink mixing ratios, exposure times, and curing specifications. Written procedures reduce errors and make training helpers easier as you scale. Update procedures when you discover better techniques.
-
Plan capacity expansion based on bottlenecks, not assumptions. Identify which stage limits your output: screen preparation, printing speed, or curing capacity. Invest in improvements that address your actual constraint rather than buying equipment that sits idle.
Success metrics vary by business model. If you’re producing merchandise for your own brand, focus on maintaining consistent quality that builds customer loyalty. If you’re printing for clients, prioritize on-time delivery and accuracy to specifications. Track customer feedback systematically to catch quality issues before they damage your reputation.
Understanding when screen printing makes sense versus alternative methods helps you choose the right approach for each project. The dtf vs screen printing comparison clarifies which technique suits different design types, quantities, and budget constraints.
Discover DIY Printz solutions for your apparel business
Mastering screen printing in house gives you valuable production capabilities, but some projects benefit from partnering with specialists. DIY Printz produces hundreds of DTF transfer orders monthly with consistent quality and fast turnaround, handling the technical complexity so you can focus on design and sales.
Our DTF transfers work perfectly alongside your screen printing operation. Use screen printing for high-volume, simple designs where you’ve already invested in screens. Switch to DTF transfers from DIY Printz for complex gradients, photographic images, small runs, or rush orders where screen setup time doesn’t make sense. This hybrid approach maximizes efficiency and profitability across your entire product line.
Whether you need transfers for testing new designs before committing to screens, handling overflow during busy seasons, or producing specialty items your screen printing setup can’t accommodate, DIY Printz delivers ready-to-press transfers that integrate seamlessly into your workflow. Explore our services and resources at DIY Printz to see how we support apparel entrepreneurs at every production scale.
FAQ
What types of fabric work best for DIY screen printing?
Cotton and cotton-poly blends are ideal for screen printing due to excellent ink absorption and durability. These fabrics accept both plastisol and water-based inks readily, producing vibrant colors that last through repeated washing. Pure polyester requires special low-temperature inks to prevent dye migration, where heat causes fabric dyes to bleed into your print and create a faded, discolored appearance.
How do I choose the right screen mesh for my designs?
Lower mesh counts between 110 and 160 threads per inch suit bold, simple designs with solid color areas. Higher counts from 200 to 305 threads per inch capture fine details, gradients, and halftones but require more squeegee pressure and slower printing. Choosing the right mesh balances ink flow with image sharpness based on your specific design requirements. Start with 156-mesh screens for general apparel work, then expand your mesh selection as you tackle more specialized projects. The byo custom tshirt printing guide offers additional mesh selection strategies.
What is the difference between screen printing and DTF for small businesses?
Screen printing excels for volume production and vibrant flat colors, becoming more cost effective as quantities increase beyond 50 pieces per design. DTF offers flexibility with photographic images, gradients, small runs, and complex designs that would require multiple screens. Choosing depends on your typical order sizes, design complexity, available workspace, and whether you prefer investing time in setup versus outsourcing production. The dtf vs screen printing comparison helps you evaluate which method fits your specific business model and production goals.
How long does it take to learn screen printing well enough for commercial production?
Most entrepreneurs produce acceptable prints within their first week of practice, but achieving consistent commercial quality typically requires 4 to 6 weeks of regular printing. Your learning curve depends on how many variables you tackle simultaneously. Start with single-color designs on white cotton shirts to master basic technique before adding complexity like multiple colors, dark garments, or difficult fabrics. Focus on perfecting one stage of the process at a time rather than trying to master everything immediately.