


Trying to create flawless heat transfers on your apparel without expensive printing equipment can feel challenging, especially when busy workspaces or messy materials cause mistakes. For small apparel businesses and passionate DIYers, a clean workspace and careful preparation are the building blocks of success. By focusing on setup, organization, and smart heat management, you set yourself up for consistent, professional results every single time.
Table of Contents
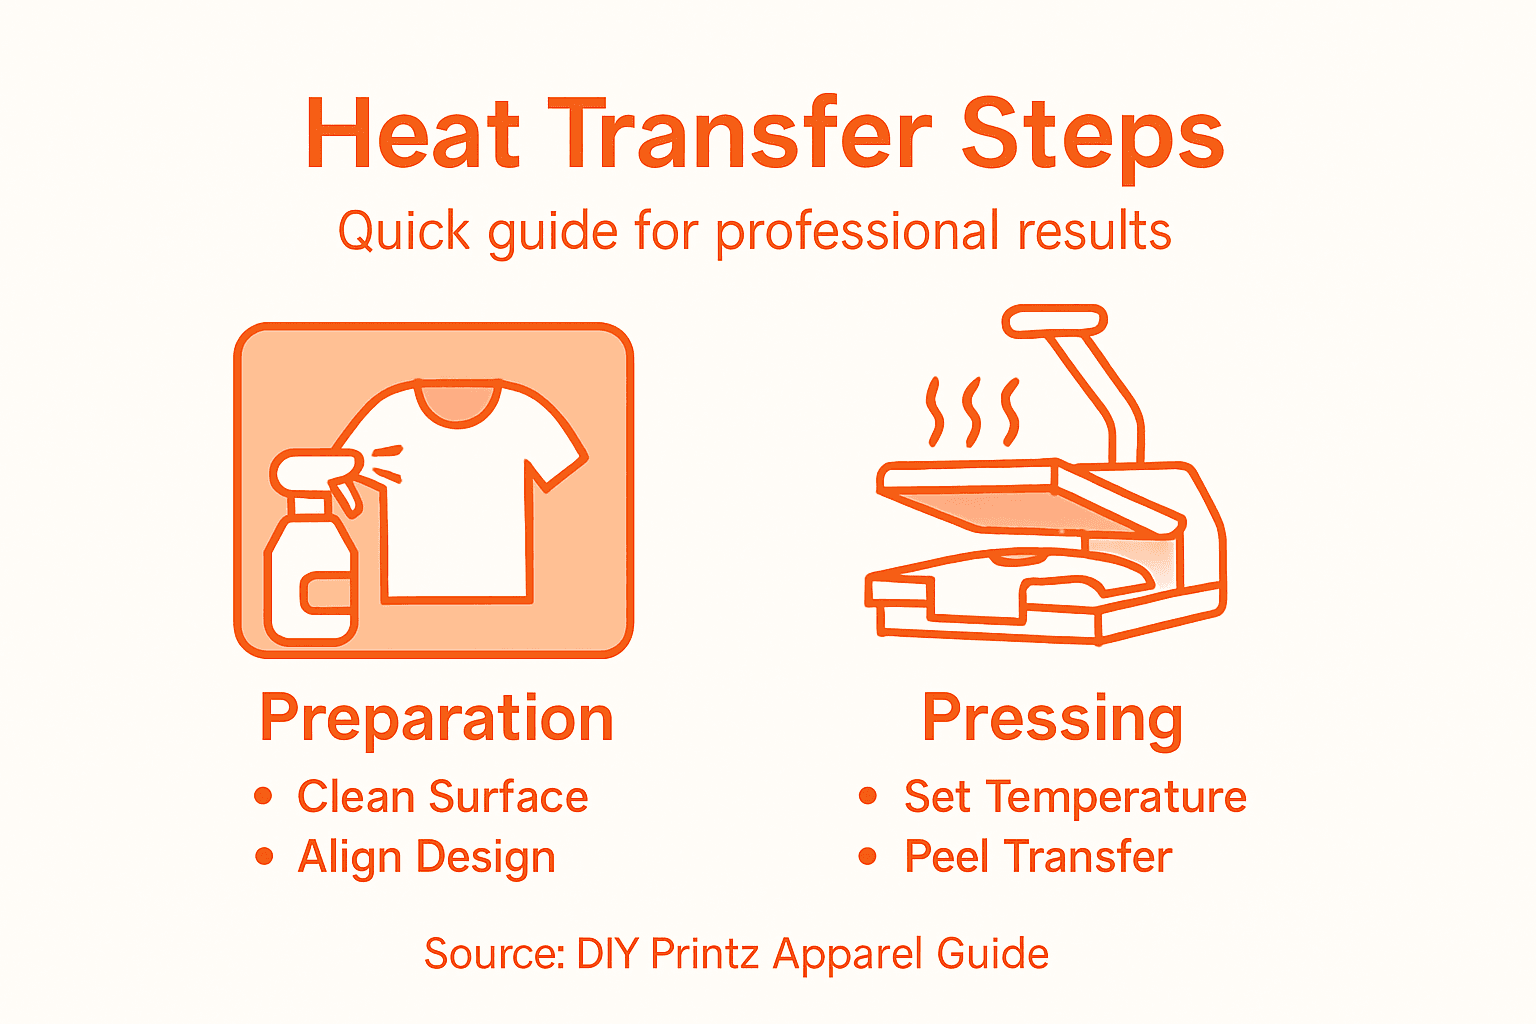
- Step 1: Prepare Your Work Surface And Materials
- Step 2: Position And Secure The Heat Transfer
- Step 3: Set Your Heat Press For Best Results
- Step 4: Press And Peel The Transfer Safely
- Step 5: Inspect Your Finished Apparel
Quick Summary
| Key Insight | Explanation |
|---|---|
| 1. Maintain a clean workspace | A tidy work area prevents contamination, ensuring your transfers adhere properly and look crisp. |
| 2. Position transfers accurately | Proper alignment is crucial for even heat distribution, leading to a professional-looking finish. |
| 3. Set correct heat press settings | Use recommended temperature, pressure, and time to ensure optimal adhesion and prevent damage. |
| 4. Peel transfers carefully | Slow and steady peeling while following guidelines minimizes the risk of damaging the transfer. |
| 5. Inspect completed apparel | Thorough inspection identifies issues early, maintaining quality and customer satisfaction. |
Step 1: Prepare Your Work Surface and Materials
If you want to apply DTF transfers successfully, you need to start with the basics: a clean, organized work surface and materials ready to go. This step sets the foundation for everything that comes next. Get this right, and your pressing will go smoothly. Get it wrong, and you’re fighting uphill.
The first thing to do is clear your work surface completely. Remove clutter, dust, and any debris that could interfere with your transfers or heat press. A clean workspace prevents contamination and keeps your transfers looking crisp. Wipe down your heat press platen (the flat surface where pressing happens) with a damp cloth, and allow it to dry fully before starting.
Temperature control matters more than you might think. Make sure your work area has adequate ventilation and airflow. According to OSHA guidance on heat exposure controls, proper engineering controls like ventilation reduce heat-related stress on you and your materials. Open windows, run a fan, or work near an air-conditioned space. Your body and your transfers will thank you.
Organize your materials before you start pressing:
- DTF transfers organized by order or design
- Blank apparel sorted and ready (shirts, hoodies, hats)
- Heat press settings sheet visible and accessible
- Teflon sheets or parchment paper for each press cycle
- Water bottle within arm’s reach for hydration
Hydration and proper acclimatization to heat stress are critical when working with high-temperature equipment. Drink water regularly, take breaks if you feel fatigued, and wear loose, breathable clothing that won’t restrict movement.
Check your heat press one last time. Verify the platen is clean, the temperature dial is set correctly, and all controls respond properly. A quick test run (60 seconds with no transfer) confirms everything is functioning.
A well-prepared workspace saves time, prevents mistakes, and keeps you safe while working with heat transfers.
Pro tip: Lay out your transfers and apparel in the exact order you’ll press them, creating an assembly-line flow that keeps you moving efficiently without backtracking or second-guessing what comes next.
Step 2: Position and Secure the Heat Transfer
This step determines whether your transfer looks professional or turns into a wrinkled mess. Proper positioning and securing ensures even heat distribution across the entire design, which is critical for a clean, durable finish that lasts through multiple washes.
Start by laying your blank apparel flat on the heat press platen. Smooth out any wrinkles or bunches in the fabric before you place the transfer. The fabric needs to be completely flat and taut, with no folds that could create pressure inconsistencies during pressing.
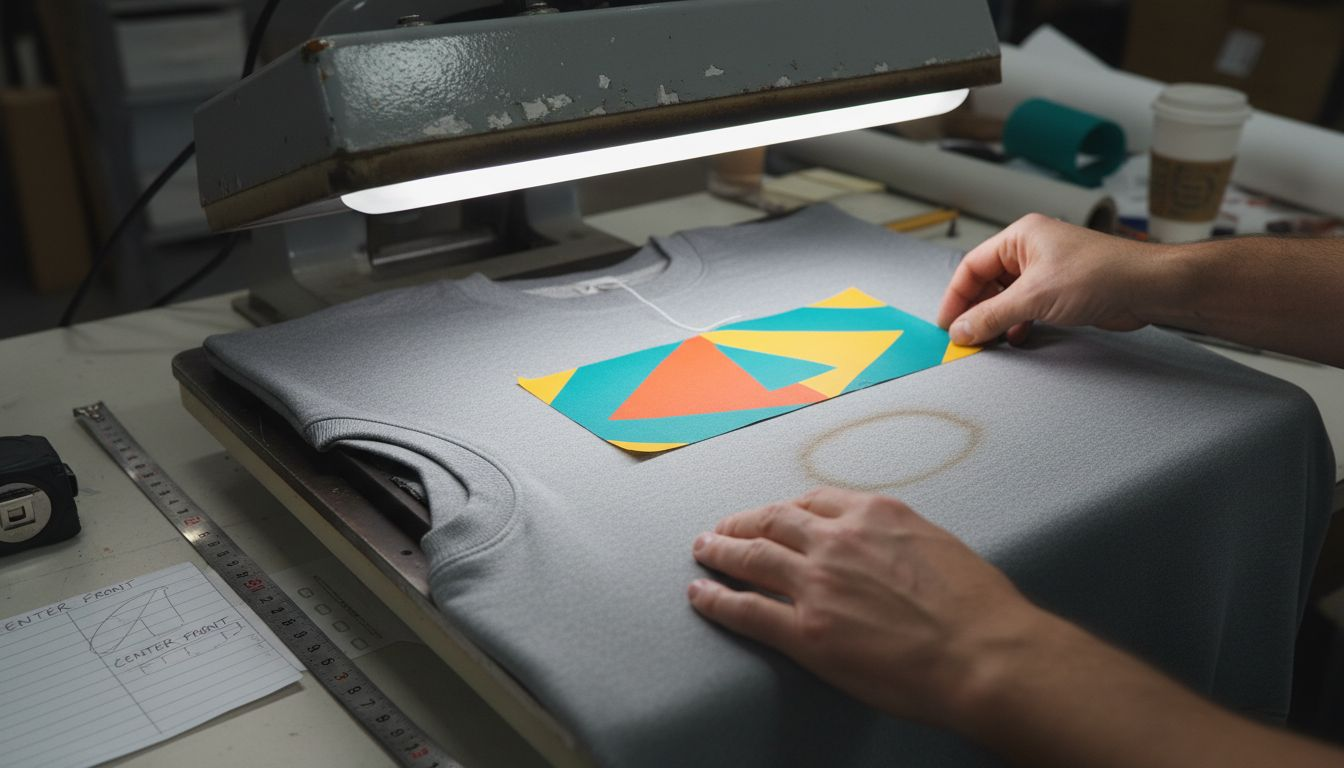
Now position your DTF transfer on the apparel. Check the placement against your original design specs or mockup. Center the transfer if that’s your design, or position it exactly where it needs to be based on your customer’s order. Take a moment to verify alignment before moving forward.
Securing the transfer is where precision matters. Optimal thermal contact between the transfer and fabric ensures uniform heat application and prevents the design from shifting during the pressing cycle. Use these techniques to lock it in place:
- Tack press: Run a quick 3-5 second press at low pressure to anchor the transfer corners
- Teflon sheet placement: Lay your Teflon sheet over the transfer before full pressing
- Light hand pressure: Hold the transfer steady if doing a tack press manually
- No movement: Once secured, do not adjust or reposition the transfer
The transfer should not move, slide, or shift when you apply pressure. Even heat transfer distribution/14%3A_Heat_and_Heat_Transfer_Methods) depends on consistent contact between layers, which only happens when everything stays in place throughout the cycle.
Double-check your setup one final time. Is the apparel flat? Is the transfer positioned correctly? Are all corners secure? Once you’re confident, you’re ready to press.
A transfer that shifts even slightly during pressing creates blurry edges and uneven color saturation. Lock it down before heat is applied.
Pro tip: Use a light tack press of 3-5 seconds at lower temperature and pressure first, then do your full pressing cycle, which prevents accidental movement while you’re still making fine positioning adjustments.
Step 3: Set Your Heat Press for Best Results
Getting your heat press settings right is the difference between a transfer that looks professional and one that looks amateurish. Temperature, pressure, and time work together to create the perfect bond between transfer and fabric without damaging either one.
Start by checking your DTF transfer specifications. Most DTF transfers require temperatures between 300°F and 330°F, but always verify the exact settings provided by your transfer supplier. Different materials and fabric types may need slight adjustments within that range.
Set your heat press temperature first. Use the control dial to reach your target temperature, then allow the press to fully heat up. Most modern presses have indicator lights that show when they’re ready. Wait at least 2-3 minutes before pressing to ensure consistent, even heat distribution.
Pressure settings are equally critical. Proper heat press controls ensure optimal adhesion while maintaining worker safety and product quality. Your pressure should be firm enough to create contact between all layers, but not so heavy that it damages delicate fabrics.
Here’s how to set your key parameters:
- Temperature: Set to manufacturer recommendation (typically 300-330°F for DTF)
- Pressure: Adjust to medium-firm (roughly 3-4 bars on most commercial presses)
- Time: Start with 10-15 seconds for standard cotton apparel
- Peel timing: Most DTF transfers require a hot or warm peel immediately after pressing
Temperature management isn’t just about quality. Controlling heat exposure protects you from burns and heat-related stress while you’re working. Keep your face and hands at safe distances from the press.
Make a test press on scrap fabric if you’re uncertain about your settings. This takes 30 seconds and saves you from ruining a customer order. Once you confirm the transfer adheres properly and the colors look vibrant, you’re ready for production.
Wrong settings create peeling transfers, faded colors, or burned fabric. Right settings create transfers that last for years.
Pro tip: Write down your exact temperature, pressure, and time settings on a sticky note and place it directly on your heat press, eliminating guesswork and ensuring consistency across every single press cycle.
Refer to this quick guide for recommended DTF press parameters:
| Parameter | Standard Range | Impact on Result |
|---|---|---|
| Temperature | 300°F – 330°F | Controls transfer adhesion |
| Pressure | Medium to firm (3-4 bar) | Ensures full layer contact |
| Time | 10–15 seconds | Balances color and bonding |
| Peel Timing | Hot or warm peel | Affects edge cleanness |
Step 4: Press and Peel the Transfer Safely
This is where your transfer goes from positioned to permanently bonded. The pressing and peeling phase requires focus and caution because you’re working with extreme heat. Do this correctly, and your transfer will look flawless. Rush it, and you’ll damage the design or worse, burn yourself.
Lower the heat press platen slowly and deliberately. Do not slam it down or apply pressure too quickly. Once the platen makes full contact with the transfer, the timer starts automatically on most modern presses. Stand back from the press during the entire cycle. Heat-related burn injuries are real risks when working near hot equipment, so keep your face and hands away from steam and heat exposure.
Watch the timer carefully. Most DTF transfers require 10-15 seconds of pressure. When the timer sounds, raise the platen slowly and steadily. Do not jerk it upward or apply uneven pressure during release.
Peeling requires precision and patience. Here’s how to peel your transfer safely:
- Wait for the right temperature: Most DTF transfers peel best while still warm, not scorching hot
- Use a tool: Grab a plastic scraper or peel stick, never your bare fingers
- Peel at a 45-degree angle: Start from one corner and pull steadily, not aggressively
- Support the fabric: Hold the apparel firmly with your other hand to prevent pulling
- Inspect as you peel: Watch for any areas that didn’t transfer properly
Do not peel too quickly or at the wrong temperature. Proper safety equipment and handling procedures minimize burn risk and ensure transfer quality during the peeling phase. If you’re unsure whether the transfer has set properly, wait 15-20 seconds before peeling.
Once fully peeled, lay the finished apparel on a clean surface to cool completely. Never fold or stack transfers while they’re still warm.
A slow, steady peel creates clean edges and vibrant colors. A rushed peel creates lifted corners and frustrated customers.
Pro tip: Keep a damp cloth nearby to cool your hands between presses, and wear heat-resistant gloves if you’re doing high-volume pressing, which reduces fatigue and burn risk significantly.
Step 5: Inspect Your Finished Apparel
Inspection separates amateur work from professional results. Before you ship, gift, or wear any finished apparel, take 60 seconds to verify that your transfer looks flawless. This step catches problems early and protects your reputation.
Start by examining the transfer under good lighting. Hold the apparel at arm’s length and scan the entire design for obvious defects. Look for color inconsistencies, faded areas, or sections where the transfer didn’t adhere properly to the fabric.
Check the edges carefully. The transfer edges should be clean and sharp, not lifted, peeling, or frayed. Run your fingers gently along the borders to confirm the transfer is firmly bonded. If you feel any lifting or separation, the press settings may need adjustment for future orders.
Now perform a detailed quality check:
- Color saturation: Does the transfer color match the design? Is it vibrant and consistent throughout?
- Adhesion: Gently try to peel a corner. The transfer should not budge.
- Detail clarity: Are fine lines and small text crisp and readable, not blurry?
- Alignment: Does the design sit in the correct position on the apparel?
- No defects: Look for burns, scorch marks, or fabric damage around the transfer
Systematic quality control inspection ensures your finished apparel meets professional standards and customer expectations. Document any issues you find so you can adjust your process for the next batch.
If the transfer looks perfect, you’re done. If you spot problems, note what went wrong (temperature too high, pressure too low, timing off) and adjust before pressing more apparel. Durability and transfer adherence must meet professional standards for lasting customer satisfaction.
Allow the apparel to cool completely before packaging or folding. A transfer that looks perfect when hot may develop issues if handled before it fully sets.
Here’s a summary of common DTF transfer issues and how to prevent them:
| Issue | Possible Cause | Prevention Tip |
|---|---|---|
| Peeling transfer | Low pressure or temperature | Confirm press settings and calibration |
| Faded colors | Insufficient temperature/time | Double-check supplier specifications |
| Wrinkled design | Fabric not smoothed or aligned | Lay apparel perfectly flat |
| Burned fabric | Excessive heat or time | Test on scrap material first |
| Blurry edges | Transfer shifted during pressing | Use tack press and avoid movement |
Perfect transfers become repeat customers. Mediocre transfers become complaints and returns.
Pro tip: Create a simple checklist on your phone with your five quality criteria, and photograph one sample from each batch to track consistency over time and spot patterns in any issues.
Simplify Your Heat Transfer Process with DIY Printz
Applying heat transfers perfectly takes precision and careful control over temperature, pressure, and timing. If you struggle with consistent results, managing the learning curve, or dealing with the hassle and maintenance of owning a DTF printer, DIY Printz is here to help. We produce ready-to-press DTF transfers at high volume that deliver professional-looking apparel every time without the stress of complicated setup.
Take your apparel business or creative projects to the next level with transfers designed for vibrant colors, sharp details, and lasting adhesion. Outsource your DTF transfer production to a trusted partner known for consistent quality and fast turnaround. Focus on pressing, fulfilling orders, and growing your brand, while DIY Printz handles the complex printing process. Visit DIY Printz today to get started with reliable, ready-to-use transfers and experience how easy flawless heat transfers can be. Discover more about our service at DIY Printz and make your heat press work smarter, not harder.
Frequently Asked Questions
How do I prepare my workspace for applying heat transfers on apparel?
Start by clearing your work surface to ensure it is clean and organized. Wipe down your heat press platen and ensure your materials are sorted and accessible for an efficient workflow.
What temperature and pressure settings should I use for heat transfers?
Most heat transfers require a temperature between 300°F and 330°F with medium to firm pressure. Adjust your heat press accordingly and allow it to fully heat up before starting your pressing cycle.
How can I ensure my heat transfer is positioned correctly?
Lay your blank apparel flat and smooth out any wrinkles before placing the transfer. Verify the alignment with your design specs and use a tack press to secure the corners before the full pressing cycle.
What should I do if my transfer doesn’t adhere properly during pressing?
If you notice an issue with adhesion, first check your temperature, pressure, and time settings to ensure they match the requirements for your specific transfer. Make adjustments as needed and perform a test press on scrap fabric to confirm.
How do I safely peel the transfer after pressing?
Wait until the transfer is warm but not scorching hot, and use a plastic scraper for peeling at a 45-degree angle. This technique minimizes the risk of damage and ensures clean edges for your final product.
What should I inspect after applying the heat transfer?
Carefully examine the transfer for color consistency, edge clarity, and adhesion. Look for any defects, and if issues are found, document them so you can adjust your pressing parameters for future applications.
Recommended
- DTF Transfer Application Guide for Perfect Results – DIYPRINTZ
- Custom Apparel Printing Guide for Easy DTF Transfers – DIYPRINTZ
- What Are Custom Transfers: Simplifying Apparel Printing – DIYPRINTZ
- DTF Transfer Workflow Guide for Custom Apparel Success – DIYPRINTZ
- Start a Clothing Influencer Program That Sells – MEXESS
- How to Mix Art with Streetwear for Unique Style – ELEDOasis