


You press a beautiful custom design onto a shirt, confident in your work. Three washes later, the colors have faded and edges are peeling. Sound familiar? Over 70% of DTF transfer failures result from easily avoidable pressing errors. This guide addresses those issues with precise application steps and troubleshooting. You will learn how to prepare, press, and care for DTF transfer garments for lasting quality.
Table of Contents
- Prerequisites and Preparation
- Core Steps for Applying DTF Transfers
- Post-Press Care and Outcomes
- Troubleshooting and Common Mistakes
- Summary and Next Steps
- Explore DIY Printz Solutions for Perfect DTF Transfers
- Frequently Asked Questions About Applying DTF Transfers
Key Takeaways
| Point | Details |
|---|---|
| Prerequisites Matter | Commercial heat press, compatible fabrics, and proper pre-press preparation prevent most failures |
| Core Pressing Parameters | 285-305°F, medium to firm pressure, 10-15 seconds, cold peel ensures professional adhesion |
| Post-Press Care | Inside-out washing in cold water, tumble dry low maintains vibrancy for 20+ washes |
| Common Mistakes | Wrong temperature, skipping pre-press, hot peeling, and no test presses reduce durability |
| Troubleshooting Fixes | Calibrate heat press, test settings on scrap fabric, add post-press for adhesion boost |
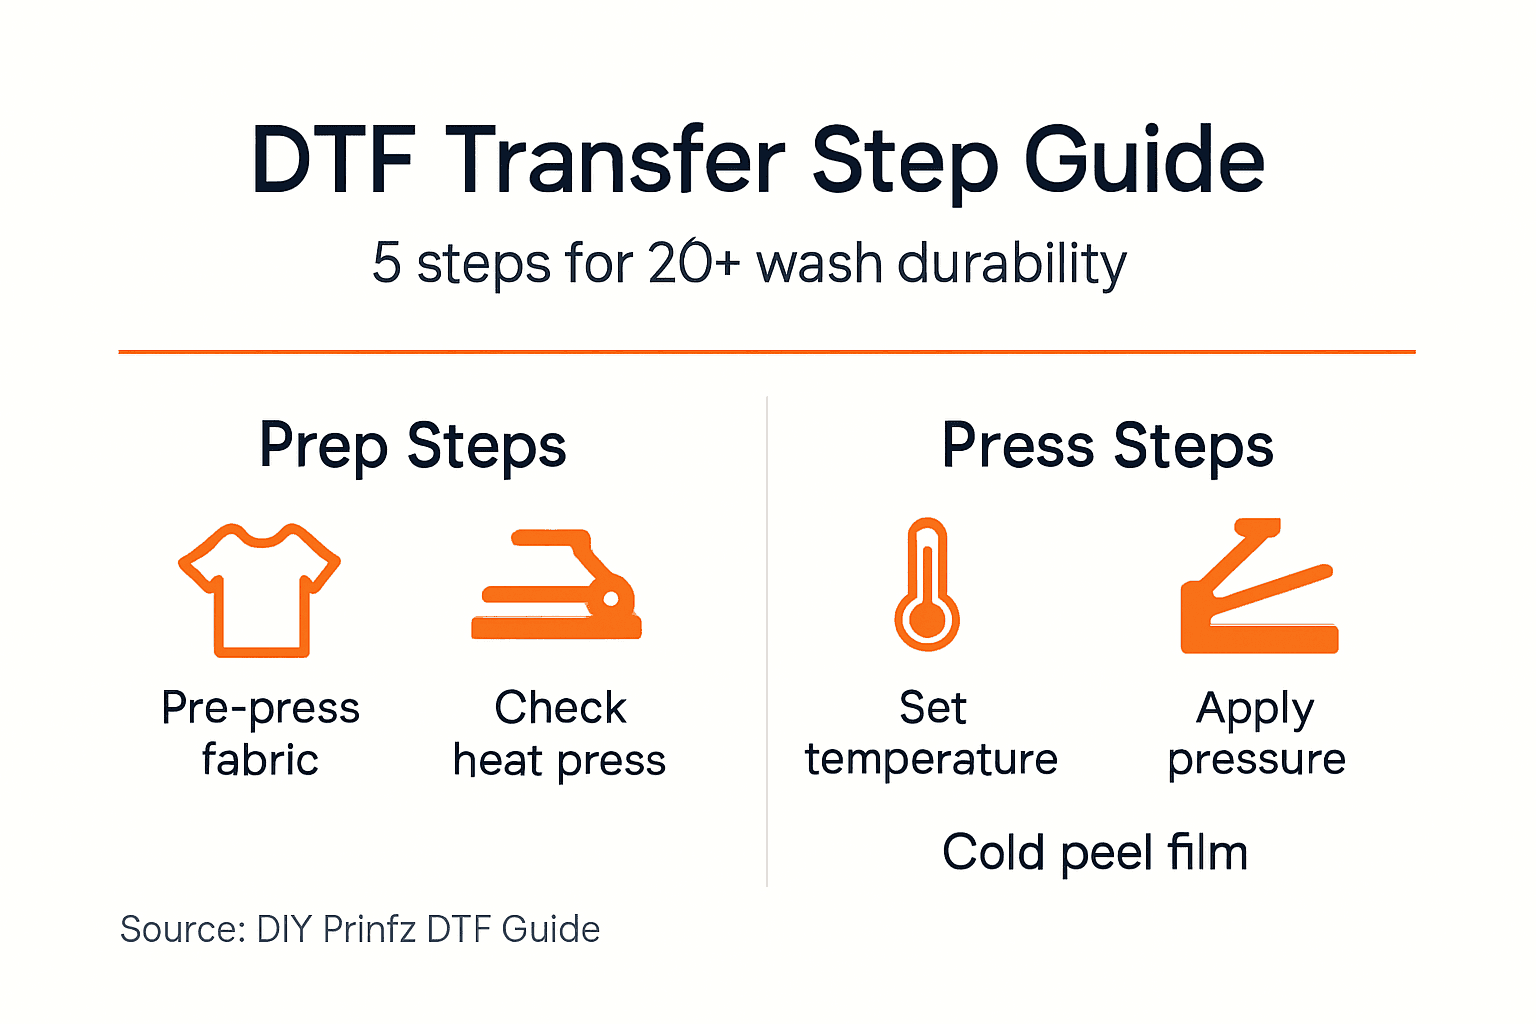
Prerequisites and Preparation
Your results depend entirely on what happens before you press. Proper equipment and fabric preparation eliminate most transfer failures before they start.
Essential Equipment and Compatible Fabrics:
- Use a commercial-grade heat press with accurate temperature control, not a home iron or Cricut EasyPress
- Compatible fabrics include cotton, polyester, blends, fleece, and hoodies
- Optional tools like heat-resistant tape secure small transfers during pressing
- A lint roller removes debris that creates gaps in adhesion
Pre-Press Preparation Steps:
- Remove all lint and debris with a lint roller before positioning your transfer
- Pre-press garments for 3-5 seconds to remove wrinkles and moisture that interfere with bonding
- Preheat your heat press fully to target temperature before starting, ensuring even heat distribution across the platen
- Test press settings on scrap fabric matching your production garment to verify temperature and pressure
Skipping the pre-press step is one of the fastest routes to failure. Moisture trapped in fabric creates steam during pressing, preventing the adhesive from bonding properly. Similarly, wrinkles create uneven pressure distribution that leaves some areas poorly adhered. The DTF transfer application guide covers additional preparation techniques for specialized fabrics.
Many beginners assume their heat press is ready once the temperature display shows the target number. Actually, the platen needs several minutes to reach uniform temperature across its entire surface. Hot spots and cold zones create inconsistent results. Professional DTF transfer workflow practices always include a full preheat cycle.
Core Steps for Applying DTF Transfers
Once your equipment and garment are prepared, the actual pressing process follows a precise sequence. Each variable matters for achieving professional adhesion.
Step-by-Step Pressing Sequence:
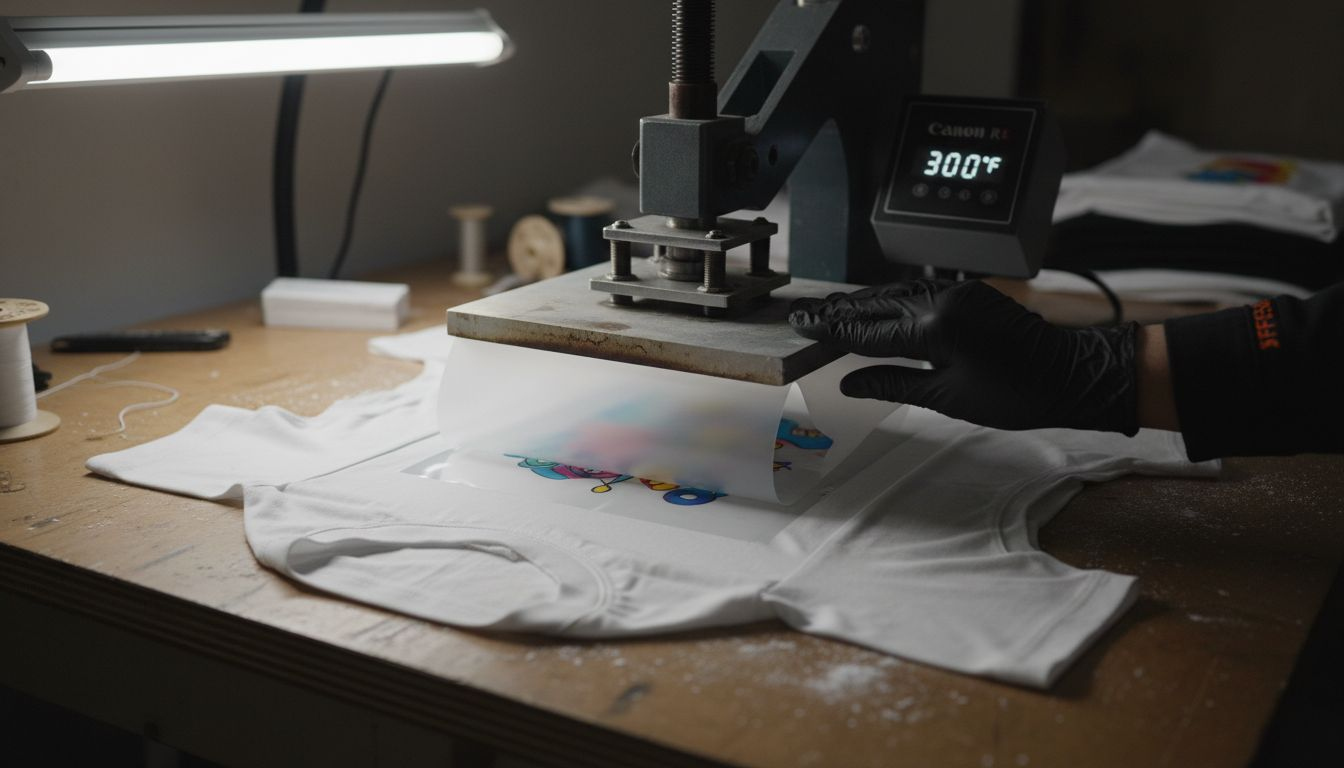
- Set your heat press temperature between 285-305°F (140-152°C) based on fabric type
- Position the transfer printed side down, film side facing up on the garment
- Secure transfer edges with heat-resistant tape if working with small or intricate designs
- Apply medium to firm pressure evenly for 10-15 seconds to activate the adhesive powder
- Open the press and allow the garment to cool completely before handling
- Peel the transfer film cold in a smooth, steady motion to avoid design lifting
- Optional: Apply a 5-second post-press with a cover sheet to enhance durability
Pro Tip: Always peel slowly and at a low angle. Rushing the peel or pulling straight up puts unnecessary stress on the adhesive bond, especially at fine details and edges.
The temperature range isn’t arbitrary. Below 285°F, the adhesive powder doesn’t fully melt and bond. Above 305°F, you risk scorching lighter fabrics or causing the adhesive to over-cure and become brittle. Cotton blends typically work best at the higher end (300-305°F), while 100% polyester performs better at the lower end (285-295°F) to prevent heat damage.
Pressure settings vary by heat press model, but you should feel resistance when closing the press. Too little pressure leaves gaps in the bond. Too much pressure can squeeze adhesive beyond the design edges, creating a halo effect. The DTF printing checklist helps you dial in these variables systematically.
Cold peeling is non-negotiable for most DTF transfers. The film protects the design during pressing, but removing it while hot stretches the partially-set adhesive. Wait at least 30 seconds for cooling. Some transfer types allow warm peeling, but cold peel is the safer default. Check heat transfer application tips for fabric-specific guidance.
Post-Press Care and Outcomes
Perfect pressing means nothing if poor washing ruins the transfer after a few cycles. Proper garment care extends durability dramatically.
Washing and Maintenance Best Practices:
- Turn garments inside out before washing to protect the transfer surface from abrasion
- Use cold water and mild detergents without harsh chemicals or bleach
- Tumble dry on low heat or air dry to prevent heat damage to the transfer
- Avoid fabric softeners that create a coating over the transfer, reducing breathability
- Never iron directly on the transfer; use a pressing cloth if touch-ups are needed
Pro Tip: Add a final 5-second post-press after peeling the film. This extra heat sets the adhesive more deeply and creates a smoother finish that resists cracking.
When you follow proper application and care, you should expect vibrant colors and zero peeling after 20+ wash cycles. The transfer maintains its soft hand feel, not the plastic-like texture of poorly applied vinyl. Customers notice this quality difference immediately.
Many apparel businesses lose repeat customers because their transfers fail prematurely. A shirt that looks great initially but falls apart after three washes destroys brand reputation faster than almost any other mistake. The benefits of DTF transfers include durability, but only when application fundamentals are executed correctly.
The optional post-press step takes seconds but makes a measurable difference in longevity. It allows the adhesive to penetrate fabric fibers more completely while smoothing any texture left by the film. Professional print shops include this step in every production run. Home users often skip it, then wonder why their results don’t match commercial quality. Small details separate amateur from professional outcomes.
Additional DTF printing tips cover advanced care techniques for specialty fabrics and high-volume production environments.
Troubleshooting and Common Mistakes
Even experienced printers encounter problems. Recognizing failure patterns and their fixes prevents wasted materials and customer complaints.
Frequent Application Errors and Solutions:
- Wrong temperature: Causes peeling or dull colors; fix by calibrating your heat press with an infrared thermometer
- Skipping pre-press: Moisture and wrinkles reduce adhesion; always pre-press for 3-5 seconds
- Hot peeling: Lifts design edges and fine details; cold peel is required for most transfers
- No test press: Increases error risk on production runs; confirm settings on scrap fabric first
- Skipping post-press: Reduces wash durability; add 5 seconds with cover sheet after peeling
| Problem | Cause | Solution |
|---|---|---|
| Peeling edges | Insufficient pressure or temp | Increase pressure, verify temp with thermometer |
| Faded colors | Temperature too low | Raise temp by 10°F, extend press time 2-3 seconds |
| Scorched fabric | Temperature too high | Lower temp by 15°F, reduce press time |
| Uneven adhesion | Cold spots on platen | Allow longer preheat, check heating element |
| Film won’t peel | Over-pressed or wrong peel temp | Let cool completely, peel more slowly |
Pro Tip: Keep a pressing log for your first 20 transfers. Record fabric type, temperature, pressure setting, press time, and peel temperature. This data reveals patterns and helps you dial in perfect settings faster.
Most transfer application failures stem from wrong heat press temperature or pressure and peeling errors. These variables interact, so changing one often requires adjusting others. Cotton tolerates higher heat but needs more pressure. Polyester needs lower heat but bonds quickly.
Heat press calibration drifts over time. The display might show 300°F while the actual platen temperature is 285°F or 315°F. Invest in an infrared thermometer and check calibration monthly. A $30 tool prevents hundreds of dollars in wasted transfers and remakes.
Another common mistake is applying too many transfers too quickly without letting the press recover temperature between cycles. Each press drops platen temperature temporarily. In high-volume production, this leads to progressively weaker bonds as the day continues. Allow 10-15 seconds between presses for temperature recovery, or invest in a press with faster heating elements.
The DTF troubleshooting guide covers additional problems like adhesive residue, color bleeding, and specialty fabric challenges. Bookmark it for quick reference when problems arise.
Summary and Next Steps
Applying DTF transfers successfully requires attention to preparation, pressing parameters, and post-application care. Each phase builds on the previous one.
Critical Success Factors:
- Proper equipment and fabric preparation eliminate 70% of potential failures before pressing
- Precise temperature (285-305°F), pressure, and timing (10-15 seconds) ensure professional adhesion
- Cold peeling and optional post-press boost durability and finish quality
- Washing inside-out in cold water maintains transfer quality through 20+ cycles
- Test pressing on scrap fabric prevents costly mistakes on production garments
Following these structured steps guarantees professional, long-lasting prints that build customer loyalty. Common mistakes have established fixes documented throughout this guide. You now have the knowledge to avoid the errors that plague 70% of beginners.
DIY Printz offers ready-to-press high-quality transfers that eliminate the learning curve and equipment investment of in-house DTF printing. Focus on growing your brand while we handle transfer production. Proper application enhances your brand reputation and keeps customers returning for more custom apparel.
Explore DIY Printz Solutions for Perfect DTF Transfers
Ready to skip the trial and error phase? DIY Printz delivers ready-to-press transfers that arrive optimized for the pressing techniques you just learned. Our high-volume production ensures consistent quality across every order, eliminating the variability that comes with maintaining your own DTF printer.
Explore our DTF printing explained guide to understand how professional transfer production streamlines your workflow. Access our troubleshooting guide and application guide for detailed resources that boost your apparel quality and brand reputation.
Frequently Asked Questions About Applying DTF Transfers
When should I peel the transfer film, and are there exceptions?
Peel cold after the garment cools completely for 30-60 seconds in most cases. Some specialty transfers allow warm peeling, but cold peel is the safer default that prevents design lifting and edge failures.
Why does using a commercial heat press matter more than temperature alone?
Commercial heat presses provide even pressure distribution and accurate temperature control across the entire platen surface. Home irons and hobby presses create hot spots, uneven pressure, and inconsistent results that waste transfers and damage garments.
What fabrics work best with DTF transfers?
DTF transfers bond to cotton, polyester, poly-cotton blends, fleece, hoodies, and most woven and knit fabrics. Avoid fabrics with silicone coatings, high stretch content over 10%, or water-repellent finishes that prevent adhesive bonding.
How can I prevent my transfers from peeling after washing?
Use correct pressing temperature (285-305°F), apply medium to firm pressure for 10-15 seconds, cold peel the film, add a 5-second post-press, and wash garments inside-out in cold water. These steps combine to create bonds lasting 20+ wash cycles.
What special techniques help when pressing small or intricate designs?
Secure small transfers with heat-resistant tape to prevent shifting during pressing. Use a Teflon sheet as a cover to protect delicate details. Reduce pressure slightly to avoid crushing fine lines, and extend press time by 2-3 seconds to compensate for lower pressure.